


AI video tools are evolving fast, but most creators still struggle with the same issue: generating a good-looking AI video consistently takes too much time, too many retries, and way too much prompt tweaking.
I tested dozens of workflows over the past year — from pure text-to-video generation to complex prompt engineering systems — and most of them broke down once the project became longer than a few seconds. Character consistency disappeared, scenes changed randomly, and revisions became expensive very quickly.
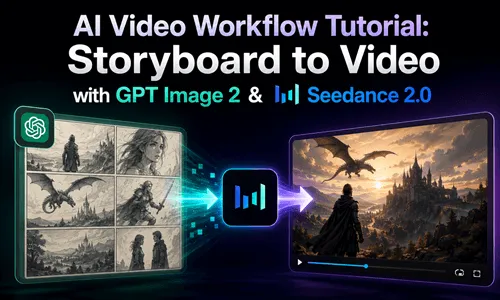
That's when I switched to a storyboard-first AI video workflow using GPT Image 2 and Seedance 2.0. Instead of relying on giant prompts, I started building visual storyboards first and then turning those frames into video. The process became dramatically faster, easier to control, and much more reliable.
If you're searching for a practical AI video workflow, a scalable AI filmmaking workflow, or a better way to handle storyboard to AI video generation, this guide walks through the exact system I use today.
Why Most AI Video Workflows Fail in Real Projects
Most creators begin with the same approach:
- 1️⃣ Write a massive prompt.
- 2️⃣ Generate a video.
- 3️⃣ Notice inconsistencies.
- 4️⃣ Rewrite the prompt.
- 5️⃣ Generate again.
- 6️⃣ Repeat until budget or patience runs out.
On paper, this sounds manageable. In reality, it becomes frustrating very quickly.
The biggest issue with a traditional AI video creation workflow is that small prompt changes often produce completely different results. You may change a single sentence about lighting or camera movement and suddenly the character looks different, the environment changes, or the tone of the scene no longer matches.
This becomes even more painful in longer videos.
A 15-second cinematic clip might require:
- 1️⃣ Multiple generations.
- 2️⃣ Prompt testing.
- 3️⃣ Expensive rerenders.
- 4️⃣ Frame corrections.
- 5️⃣ Continuity fixes.
And unlike editing an image, editing video generation mistakes usually costs more time and more credits.
Another major problem is visual consistency, also mentioned in the AI character consistency workflow.
Most text-based AI workflow in video production systems struggle to maintain:
⚠️ Common Consistency Issues
- 🧑🎤 The same character face.
- 👕 Clothing consistency.
- 🎬 Scene continuity.
- 📷 Camera style.
- 📚Storytelling flow.
The result is often a collection of impressive-looking clips that don't actually feel like one coherent film.
That's why many creators are now moving toward a storyboard to video workflow instead of relying entirely on prompts.
Why GPT Image 2 and Seedance 2.0 Create a Better AI Video Workflow
The biggest improvement in my workflow came from separating the creative process into two stages:
- 1️⃣️ Build the visual story first.
- 2️⃣ Animate the visuals into video.
This sounds simple, but it changes everything.
Instead of forcing a single giant prompt to control an entire video, you first create a storyboard that defines:
- ⭐ Characters.
- ⭐ Framing.
- ⭐ Emotional tone.
- ⭐ Scene progression.
- ⭐ Visual pacing.
Then you use AI video generation to animate those scenes.
This approach makes the entire AI video production workflow far more controllable.
1 Storyboards Work Better Than Massive Prompts
Storyboards have always been essential in traditional filmmaking.
Directors use them to plan:
- ▶️ Scene composition.
- ▶️ Character positioning.
- ▶️ Camera movement.
- ▶️ Narrative pacing.
- ▶️ Visual transitions.
In modern AI filmmaking workflows, storyboards are arguably even more important.
Why?
Because AI models understand visual references more reliably than long text instructions.
When you use a storyboard instead of a giant prompt:
- ✅ You instantly see whether the story matches your vision.
- ✅ Revisions become easier.
- ✅ Character consistency improves.
- ✅ Scene planning becomes clearer.
- ✅ Generation costs decrease.
A single storyboard frame can communicate more accurately than several paragraphs of prompt engineering.
That's why many creators moving into professional AI video generation workflows are now building visuals first instead of relying entirely on text.
2 GPT Image 2 and Seedance 2.0 Are Perfect for Storyboard-to-Video Creation
The rise of GPT Image 2 changed how creators approach AI storyboard to video production.
With GPT Image 2, generating storyboard frames is surprisingly fast. You can quickly test:
- 📌 Different camera angles.
- 📌 Character designs.
- 📌 Environments.
- 📌 Cinematic moods.
- 📌 Storytelling directions.
Most importantly, you can immediately see whether the visual direction works before spending time generating video.
That alone saves a huge amount of time.
Editing images is also dramatically cheaper and faster than rerendering full videos. If a scene feels wrong, you simply regenerate or refine a storyboard frame instead of rebuilding the entire sequence.
Once the storyboard is ready, Seedance 2.0 — with specific prompt techniques in the Seedance prompting guide — handles the animation stage extremely well.
Among current AI image to video tools, Seedance 2.0 stands out because it follows storyboard structure more accurately than many text-first video models.
Instead of guessing the story from prompts, it already has visual guidance.
That means:
- ✅ Smoother motion.
- ✅ Better continuity.
- ✅ More accurate scene transitions.
- ✅ Fewer random visual changes.
This is why the GPT Image 2 + Seedance 2.0 combination works so well for a modern AI video workflow.
The Exact AI Video Workflow I Use
Here's the process I currently use for nearly every short-form cinematic AI project.
STEP1 Start Inside LumeFlow AI
If you want to reduce both time and generation costs, using one platform that combines multiple models matters a lot.
That's why I use LumeFlow AI.
Instead of jumping between separate tools, I can handle:
- 1️⃣ Storyboard generation.
- 2️⃣ Image refinement.
- 3️⃣ AI video generation.
- 4️⃣ Iteration workflows.
All of this happens in one place.
![]() Why I Chose LumeFlow AI
Why I Chose LumeFlow AI
- 👉 Unified storyboard-to-video workflow.
- 👉 Fast switching between GPT Image 2 and Seedance 2.0.
- 👉 Lower iteration costs for AI video projects.
- 👉 Cleaner workflow management for longer scenes.
- 👉 Better consistency for cinematic storytelling.


STEP2 Use GPT Image 2 to Create a Visual Storyboard
This is where the workflow changes completely.
Instead of generating video first, I begin by generating storyboard frames with GPT Image 2.
The goal is not to create perfect artwork.
The goal is to define:
- 🎯The story.
- 🎯 Character appearance.
- 🎯 Framing.
- 🎯 Visual pacing.
- 🎯 Emotional tone.
For a 15-second sequence, I usually create around 6--10 storyboard frames depending on scene complexity.
Here's a simplified example prompt I'd use for a cinematic storyboard:

You immediately see:
- ❓ Whether the story pacing works.
- ❓ If the character design feels right.
- ❓ How scenes transition visually.
- ❓ Whether the mood matches your idea.
And if something feels wrong, fixing storyboard images is easy.
That's one of the biggest advantages of a storyboard ChatGPT workflow or using ChatGPT storyboard planning methods before video generation.
It also answers a common creator question: how to create a storyboard for a video using AI tools efficiently.
STEP3 Animate the Storyboard Frames in Seedance 2.0
Once the storyboard looks correct, I move to Seedance 2.0 for animation.
This is where the process becomes surprisingly simple.
Because the visual planning already exists, the video prompt no longer needs massive detail.
A simple prompt often works best.
For example:
That's it.
Compared to traditional AI video generation workflows, this approach dramatically reduces prompt complexity.
Seedance 2.0 already understands:
- 1️⃣ The scene structure.
- 2️⃣ Character positioning.
- 3️⃣ Composition.
- 4️⃣ Narrative direction.
This is possible because the storyboard provides visual guidance.
This is also why Seedance image to video generation tends to produce more reliable results when paired with strong storyboard planning.
STEP4 Maintain Character and Scene Consistency Across Longer Videos
One common limitation with AI-generated video is duration.
Fifteen seconds often isn't enough for a complete story.
This is where GPT Image 2 becomes extremely useful again.
Instead of starting over, I upload the previous storyboard and ask GPT Image 2 to continue the sequence while preserving character appearance, clothing, environment style, lighting, and cinematic tone.
This creates a continuation storyboard that extends the narrative naturally.
Then I refine the new frames until continuity feels smooth.
Only after the storyboard is finalized do I generate the next video sequence inside Seedance 2.0.
This workflow is significantly more stable than repeatedly regenerating long-form videos from scratch.
For creators learning how to use ChatGPT for storyboards, this iterative visual planning method is one of the most practical ways to improve consistency in AI filmmaking.
What Changed After Switching to This Workflow
The difference was immediate.
Before using storyboard-first generation, most of my time went into:
- ⌛ Prompt rewriting.
- ⌛ Rerendering failed clips.
- ⌛ Fixing inconsistencies.
- ⌛ Trying to preserve characters.
Now the workflow feels much more controlled.
The biggest improvements were:
1 Faster Iteration
I can test visual ideas quickly before committing to video generation.
2 Lower Costs
Fixing storyboard images is cheaper than regenerating multiple video attempts.
3 Better Storytelling
Scenes feel connected instead of randomly generated.
4 Stronger Character Consistency
Characters remain visually coherent across sequences.
5 More Predictable Results
The final output usually matches the original concept much more closely.
This workflow also reduced creative fatigue.
Instead of fighting prompts constantly, I spend more time directing the story itself.
That's a huge difference for long-term content creation.
Who This AI Video Workflow Works Best For
This workflow is especially useful for:
- 🌟 Short film creators.
- 🌟 AI filmmakers.
- 🌟 YouTube storytellers.
- 🌟 Ad creators.
- 🌟 Social media video teams.
- 🌟 Indie studios.
- 🌟 Solo creators.
- 🌟 Cinematic content creators.
- 🌟 Marketing teams producing visual campaigns.
It's also excellent for beginners.
Many people struggle with prompt engineering because they try controlling everything through text alone. A storyboard-first workflow makes the process much more intuitive.
If you can visualize scenes, you can build better AI videos.
Final Thoughts on Building a Better Storyboard-to-Video Workflow
The biggest lesson I learned is that AI video generation becomes far easier once you stop relying entirely on giant prompts.
Storyboards provide structure.
They make storytelling clearer, revisions easier, and video generation far more controllable.
Using GPT Image 2 for storyboard creation and Seedance 2.0 for animation creates a workflow that feels closer to real filmmaking rather than random prompt experimentation.
And when both tools are combined inside LumeFlow AI, the entire process becomes faster and easier to manage — especially for creators producing content consistently.
If you're trying to build a scalable AI video production workflow, this storyboard-first approach is one of the most practical systems available right now.